02 Aug 2023
Ethereum is a decentralized, open-source blockchain platform that enables the creation of smart contracts and decentralized applications (dApps). ERC20 is a standard for fungible tokens on the Ethereum blockchain. In this blog post, I will guide you through the process of creating a GraphQL(it could Rest too 🤷) app that connects with Ethereum networking to communicate with ERC20 tokens.
Step 1: Setting up the Development Environment
Before we begin, make sure you have the following tools installed:
Node.js and npm (Node Package Manager)
A code editor or IDE (Integrated Development Environment) such as Visual Studio Code or IntelliJ IDEA
A web3 library for JavaScript, such as Web3.js or ethers.js
Step 2: Creating a GraphQL Schema
A GraphQL schema is a definition of the types of data that can be queried and the relationships between them. To create a GraphQL schema for our app, we will use the GraphQL schema language.
`type Query {
  token(id: ID!): Token
}

type Token {
  id: ID!
  name: String!
  symbol: String!
  totalSupply: Int!
  balanceOf(address: String!): Int!
}`
In this schema, we have defined a Query type that has a single field called token. The token field takes an id argument of type ID!, which means that it is a required field. The token field returns a Token type, which has several fields: id, name, symbol, totalSupply, and balanceOf. The balanceOf field takes an address argument of type String!, which means that it is a required field.
Step 3: Creating a GraphQL Resolver
A GraphQL resolver is a function that is called when a query is executed. The resolver is responsible for fetching the data for the query and returning it in the correct format. To create a GraphQL resolver for our app, we will use the graphql-tools library.
const { graphqlHTTP } = require('express-graphql');
const { buildSchema } = require('graphql');

const schema = buildSchema(`
  type Query {
    token(id: ID!): Token
  }

  type Token {
    id: ID!
    name: String!
    symbol: String!
    totalSupply: Int!
    balanceOf(address: String!): Int!
  }
`);

const rootValue = {
  token: async (parent, { id }) => {
    const token = await getToken(id);
    return token;
  },
};

const app = express();
app.use('/graphql', graphqlHTTP({
  schema: schema,
  rootValue: rootValue,
  graphiql: true,
}));

app.listen(4000, () => {
  console.log('GraphQL server running on port 4000');
});
In this code, we have defined a schema object that contains our GraphQL schema. We have also defined a rootValue object that contains the resolver functions for our schema. The token resolver function takes an id argument and returns a Token object.
Step 4: Connecting to Ethereum Networking
To connect to the Ethereum network, we will use the web3 library.
const Web3 = require('web3');

const web3 = new Web3(new Web3.providers.HttpProvider('https://mainnet.infura.io/v3/YOUR_PROJECT_ID'));
In this code, we have created a new Web3 object and passed it a HttpProvider object that connects to the Ethereum mainnet through Infura/Alchemy.
Step 5: Querying ERC20 Tokens
To query ERC20 tokens, we will use the web3.eth.getToken method.
const token = await web3.eth.getToken(tokenAddress);
In this code, we have called the getToken method on the web3.eth object and passed it the address of the ERC20 token we want to query.
Step 6: Returning the Token Data
Once we have queried the ERC20 token, we can return the data to the client.
return {
  id: token.id,
  name: token.name,
  symbol: token.symbol,
  totalSupply: token.totalSupply,
  balanceOf: token.balanceOf,
};
In this code, we have returned an object that contains the id, name, symbol, totalSupply, and balanceOf fields of the ERC20 token.
Conclusion
In this blog post, we have covered the basics of creating a GraphQL app that connects with Ethereum networking to communicate with ERC20 tokens. We have learned how to create a GraphQL schema, create a GraphQL resolver, connect to Ethereum networking, query ERC20 tokens, and return the token data to the client. With this knowledge, you can build your own GraphQL app that interacts with the Ethereum blockchain.
28 Jun 2023
Introduction
No significant change happened to the $1.9 trillion travel industry. The pandemic led to unprecedented low travel volumes and financial strain, and all those business trips year-round are now 30-minute Zoom meetings.
The travel and hospitality industries (and their customers) are stuck with dated solutions, where online booking, cheap flight platforms, and lousy loyalty mechanics are not sufficing modern travelers and modern challenges and needs. Nomad rethinks the role of blockchain, empowering travelers and companies alike with unprecedented opportunities and creating a harmonious ecosystem that fosters trust, transparency, and unforgettable experiences.
What it does
The user’s journey starts when he/she decides to book a flight. To do so, the user can install the Nomad App and check the flights available. Due to the hackathon, we are using a specific flight (YYC - SEA) as a use case but the project can be more flexible and include more flight legs.
The app’s home screen integrates with Nomad core (NodeJs app - Backend) which provides a list of flights based on Flights API (Aviation stack API). Our Backend is hosted on [Heroku platform] Nomad Backend.
The user can go through the sign-in flow and create an account. For this step, the Nomad app integrates with Firebase Authentication (Firebase Authentication) and lets the user choose a Google account. This step is crucial because it is part of the Seamless Web3 wallet creation - the user creates a Web3 wallet with 3 clicks and does not need to worry about the bureaucratic Web3 wallet creation. During this process, the Backend will store the user’s credentials on MongoDB (MongoDB Atlas). It will automagically ether.js create the user’s Ethereum wallet and store the private key on the MongoDB. We are not really concerned about security here since the wallet will not store a huge number of tokens/rewards initially.
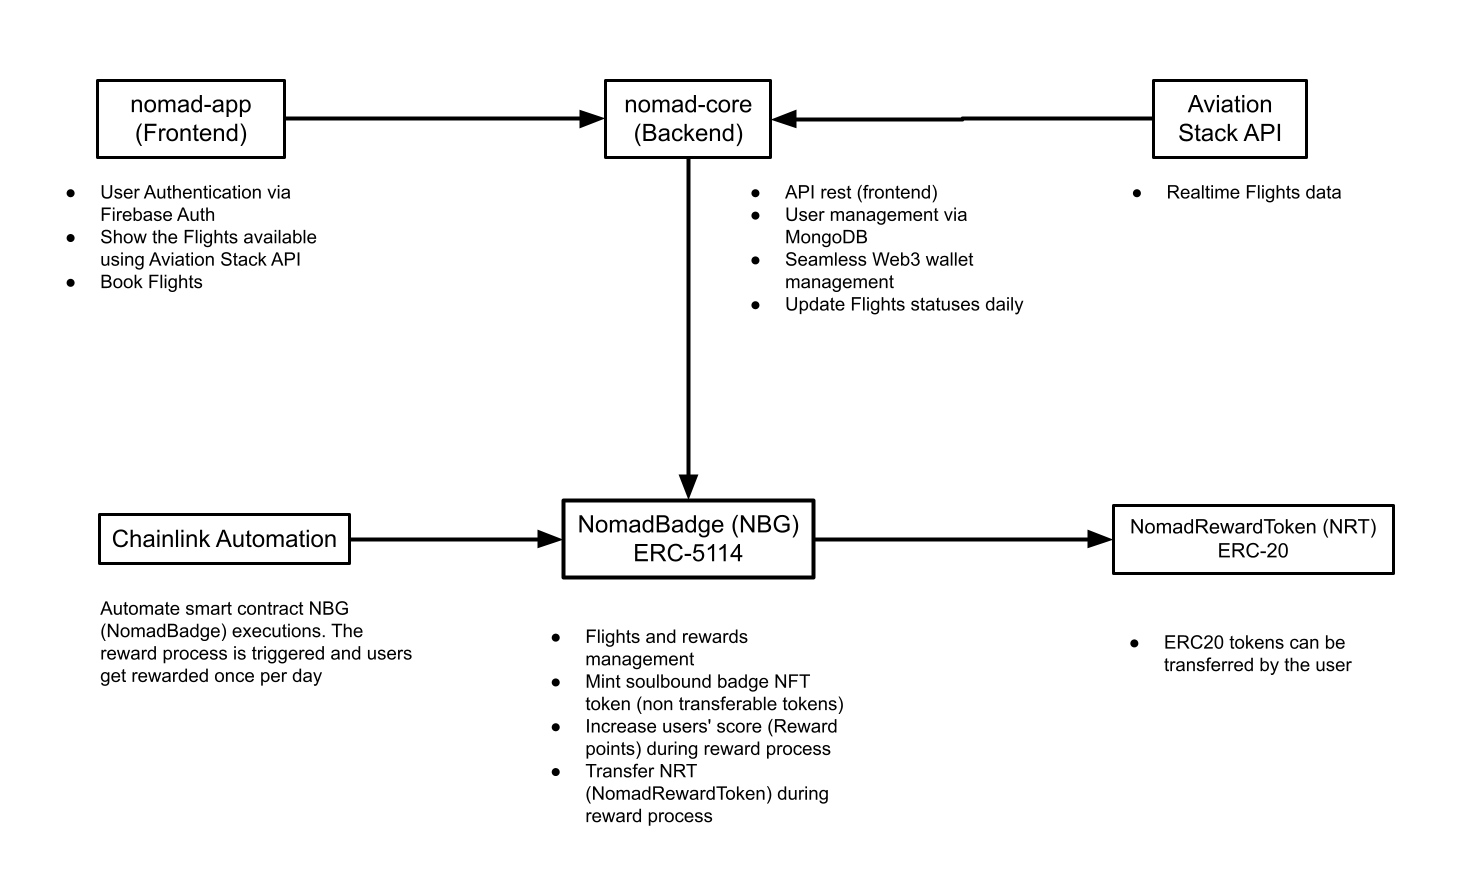
The app also has two other screens: Admin and Profile. Admin screen provides triggers to the Backend force interactions with the smart contract NomadBadge and the Flights API for only testing purposes. The Profile gives some information about User’s data on the MongoDB database and also exposes the user’s private key for testing purposes.
A flight can be booked on the Home screen. The user can tap the Buy ticket button which will trigger the Backend to add a Flight (scheduled flight status) entry on the blockchain. Notice the user has to have Funds in his wallet in order to buy a flight ticket. After the flight is added on-chain, the user has an eligible flight and can get rewards from it. The Backend will update all the scheduled flight statuses and also update the smart contract.
Chainlink Automation executes the rewarding process for NomadBadge automatically. Once per pay, Chainlink Automation triggers the rewarding process for all the ACTIVE flights. The NomadBadge mints an NBG token if the user does not have an NBG token according to the Soulbound token specification.
We used a Soulbound token as a reference to a user’s non-transferable experience with the airline/flight. This and in conjunction with the reward system offers airlines a unique and dynamic loyalty system that engages users with their experience/status and rewards them with points they can use or transfer to others.
After that, the NomadBadge attributes rewards points to the user token and also transfers ERC20 tokens (NomadRewardToken - NRT) to the user’s wallet. The ERC20 tokens can be transferred at any time by the user. By the end of the process, NomadBadge changes the flight status to REWARDED.
Built With
- alchemyapi
- chainlink
- ethersjs
- express.js
- firebase
- heroku
- javascript
- kotlin
- mongodb
- node.js
- openzeppelin
- solidity
- typescript
21 Apr 2023
Material3 is the latest design system from Google that brings a fresh look and feel to Android apps. When combined with Jetpack Compose, Google’s modern UI toolkit for building native Android apps, developers have a powerful combination at their disposal. Let’s delve into the main components of Material3 for Android and how they integrate with Jetpack Compose.
Material3 Components
- Typography
Typography in Material3 focuses on readability and hierarchy. It includes a range of text styles and weights to help developers create visually appealing and accessible interfaces.
- Color System
Material3 introduces a new color system that offers a wider palette and more flexibility for customizing app themes. It includes primary, secondary, surface, and on-surface colors to ensure consistency across the app.
- Shape
The shape system in Material3 defines the corner radius for components like buttons, cards, and dialogs. It allows for consistent and visually pleasing rounded corners throughout the app.
- Elevation
Elevation helps create a sense of depth and hierarchy in the UI. Material3 provides a standardized elevation system for components, making it easier to design interfaces with consistent shadows and overlays.
- Motion
Motion in Material3 adds fluidity and responsiveness to app interactions. It includes predefined animations for common UI transitions, enhancing the user experience and making the app feel more dynamic.
Integrating Material3 with Jetpack Compose
Jetpack Compose simplifies UI development by using a declarative approach to building interfaces. When integrating Material3 with Jetpack Compose, developers can leverage the following:
-
MaterialTheme
The MaterialTheme composable allows developers to apply Material3 styles and components to their UI elements. It provides easy access to typography, colors, shapes, and other design elements defined in Material3.
-
Material3 Components
Material3 components like Button, TextField, Card, and BottomSheet are designed to work seamlessly with Jetpack Compose. Developers can use these components to create modern and consistent UIs that follow Material Design guidelines.
-
Theming
Jetpack Compose makes theming easy by allowing developers to define custom themes and apply them to different parts of the app. By combining Material3’s design system with Jetpack Compose’s theming capabilities, developers can create visually appealing and cohesive user interfaces.
In conclusion, Material3 for Android and Jetpack Compose offer a powerful combination for building modern and visually engaging apps. By understanding the main components of Material3 and how they integrate with Jetpack Compose, developers can create UIs that are not only beautiful but also user-friendly and consistent.
22 Mar 2023
Title: Jetpack Compose vs. Reactive JS: Battle of the UI Titans
In the realm of modern UI development, two prominent technologies have emerged as game-changers: Jetpack Compose for Android app development and Reactive JS for web development. As a software engineer specializing in Android app development and interested in web technologies, you’ll find this comparison insightful. In this blog post, we’ll explore the key features, benefits, and use cases of Jetpack Compose and Reactive JS, shedding light on their similarities and differences.
Jetpack Compose: Unleash the Android Magic
If you’re all about crafting pixel-perfect Android apps that dazzle users, Jetpack Compose is your new best friend. This Google-born toolkit is like a breath of fresh air in the Android development scene. With Kotlin as its wingman, Compose lets you conjure up UIs using a super cool declarative style. You’re basically telling your app what you want it to look like, and boom, it works its magic!
Key Features and Perks:
-
Declarative UI: Jetpack Compose allows developers to describe UI components using a declarative syntax, which eliminates the need for manually managing UI updates and simplifies the codebase.
-
Reactive Data Flow: Jetpack Compose utilizes a reactive programming model, ensuring that UI updates are automatically triggered when the underlying data changes.
-
Compose UI Elements: UI components in Jetpack Compose are themselves functions, enabling developers to create complex UIs by composing smaller, reusable building blocks.
-
State Management: Jetpack Compose provides built-in tools for managing UI state, reducing the complexity associated with state management in traditional Android development.
Reactive JS: Web Wizardry at Its Best
But hey, let’s not forget the web realm! Reactive JS, the rockstar of web development, is all about building those slick and responsive web apps. It’s the magic wand for creating dynamic user interfaces that dance to the tune of data and events.
Key Features and Cool Stuff:
-
Component-Based Architecture: Reactive JS frameworks promote component-based development, enabling developers to create modular UI components that can be reused and managed more efficiently.
-
Virtual DOM: Reactive JS frameworks employ a Virtual DOM, which optimizes UI updates by calculating the minimal set of changes needed to update the actual DOM, leading to improved performance.
-
One-Way Data Flow: Reactive JS follows a unidirectional data flow, where data flows from parent components to child components, simplifying the debugging process.
-
Efficient Updates: By tracking changes in data and events, Reactive JS frameworks only update the UI elements that require changes, minimizing unnecessary re-renders.
The Ultimate Face-Off: What to Choose?
So, which path should you tread? If you’re all about crafting Android apps that feel like a dream, Jetpack Compose is calling your name. With your Android expertise and Kotlin superpowers, it’s a match made in UI heaven. However if your heart beats for the web and you want to create dynamic, kickass web apps, Reactive JS is your ticket to the web wonderland. With its component party and data flow dance, you’ll be the life of the web development bash.
12 Feb 2023
Jetpack Compose is a modern UI toolkit by Google that simplifies and accelerates Android app development. With its declarative approach, Jetpack Compose allows developers to build beautiful and responsive user interfaces with less code. For developers who have been working with XML-based UI in Android, migrating to Jetpack Compose might seem like a daunting task. However, with some understanding of the process and best practices, the migration can be smooth and rewarding. In this blog post, we will explore the process of migrating existing XML-based UI code to Jetpack Compose, along with some best practices and common challenges.
Understanding the Basics
Before diving into the migration process, it’s important to understand the basics of Jetpack Compose. Jetpack Compose uses a completely different approach to building UI compared to XML-based UI. Instead of defining UI elements in XML files, Jetpack Compose uses composable functions to create the user interface. Composable functions are lightweight and modular, allowing for easier composition and reuse. With Jetpack Compose, UI elements are defined using simple Kotlin functions that return UI components, making the code more concise and readable.
Step-by-Step Migration Process
- Identify the Scope of Migration: Start by determining the scope of the migration. Analyze your XML-based UI code and identify the screens or components that you want to migrate to Jetpack Compose. It’s a good idea to start with smaller, less complex screens for the initial migration.
- Create a Composable Function: For each screen or component you want to migrate, start by creating a new composable function in your Jetpack Compose code. This function will replace the XML file and will be responsible for defining the UI elements and layout.
- Translate XML Elements to Compose: Analyze the XML code and translate each XML element and its attributes to the equivalent Jetpack Compose code. For example, if you have a TextView in XML, you would replace it with a Text composable function in Jetpack Compose.
- Refactor Layouts: XML-based layouts often use LinearLayout, RelativeLayout, or ConstraintLayout for positioning UI elements. In Jetpack Compose, you can use the powerful layout composable functions like Column, Row, and Box to achieve the desired layout. Refactor your layout code accordingly.
- Handle Styling: XML-based UI often relies on styles and themes for consistent styling. In Jetpack Compose, you can use the Material Design Components library to apply styles and themes. Refactor your styling code to use the appropriate Compose functions and APIs.
- Migrate Business Logic: Along with the UI code, you’ll also need to migrate any associated business logic. This could include event handling, data binding, or any other logic related to the UI. Update your code to use the Jetpack Compose equivalents, such as using onClick instead of onClickListener for handling click events.
- Gradual Migration: Consider adopting a gradual migration approach. Instead of migrating all screens at once, you can start by migrating individual screens or components and gradually expand the migration. This allows you to validate the changes, adapt to the new workflow, and measure the impact before fully migrating your entire application.
Best Practices
Here are some best practices to keep in mind during the migration process:
- Start with Small Screens - Begin the migration process with smaller, less complex screens or components. This will help you learn and understand the Compose syntax and concepts before moving on to more complex parts of your application.
- Refactor Incrementally - Instead of rewriting your entire XML-based UI codebase, refactor and migrate sections incrementally. This ensures that your app remains functional during the migration and reduces the chances of introducing bugs.
- Leverage Compatibility Libraries - Jetpack Compose provides compatibility libraries that allow you to use Compose alongside your existing XML-based UI code. You can gradually start using Compose in existing activities or fragments before fully migrating them.
- Validate and Test - Thoroughly test and validate your migrated screens or components to ensure they are visually and functionally equivalent to the XML-based UI. Writing unit tests and UI tests for your Compose code is crucial to catch any potential issues.
Common Challenges
Migrating from XML-based UI to Jetpack Compose can come with its fair share of challenges. Here are a few common challenges you might encounter:
- Learning Curve - Jetpack Compose introduces a new syntax and concept. It takes time to get familiar with the Compose way of building UI, especially if you are coming from an XML-based UI background.
- Interoperability with Existing Code - Integrating Jetpack Compose with existing XML-based UI code can be challenging. You might need to find workarounds or use compatibility libraries to bridge the gap between the two approaches.
- Integrating with 3rd Party Libraries - Some 3rd party libraries might not have built-in support for Jetpack Compose. You might need to find alternative libraries or write custom wrappers to integrate them seamlessly.
- Limited Documentation and Resources - Since Jetpack Compose is still relatively new, you might find limited documentation and resources compared to XML-based UI. However, the Jetpack Compose documentation and community are continuously growing.
Jetpack Compose official documentation
Migrating an app to use Jetpack Compose
Material Design Components for Jetpack Compose
Jetpack Compose Samples GitHub repository